Tips and Tricks
Essential Images
To get the most out of Wistar, here is a list of well tested and essential images:
vMX 15.1F6.9: Download can be found here: vmx. Choose the vMX for x86 Package and upload the jinstall64-vmx image as ‘vMX RE’.
vQFX. Download the latest free trail vQFX from here: vQFX The latest tested version is 15.1X53-D60
vSRX 15.1. vSRX 15.1_X49-D60.7 has been tested. Note, you need to ensure your kernel version matches the vSRX requirements.
Ubuntu 16.04. Use the ubuntu 16.04 cloud-img for a linux instance that is fully configured via cloud-init on boot up. Choose the ubuntu16 image type when uploading to wistar. Download can be found here: ubuntu.
SSH Key based authentication
Wistar will configure SSH key based authentication by default on all images that use it. For this to be useful in your environment, you need to edit the ‘ssh_user’ and ‘ssh_key’ parameters in the wistar/configuration.py file. The ‘ssh_user’ should match the user that will log into each instance. The ‘ssh_key’ should be the contents of your public SSH key. This can usually be found in ~/.ssh/id_rsa.pub
Custom Cloud Init Scripts
Wistar has native support for cloud-init (docs) for images that support it. By default, Wistar will create an ISO image that contains both a meta-data and user-data file. The user-data file is created from a default template that set’s up things like SSH key based authentication, allows root login, and set the hostname.
Wistar also allows the user to specify a custom cloud init script to be used as well. To do this, first create a new ‘Linux Script’ under the ‘Templates’ section.

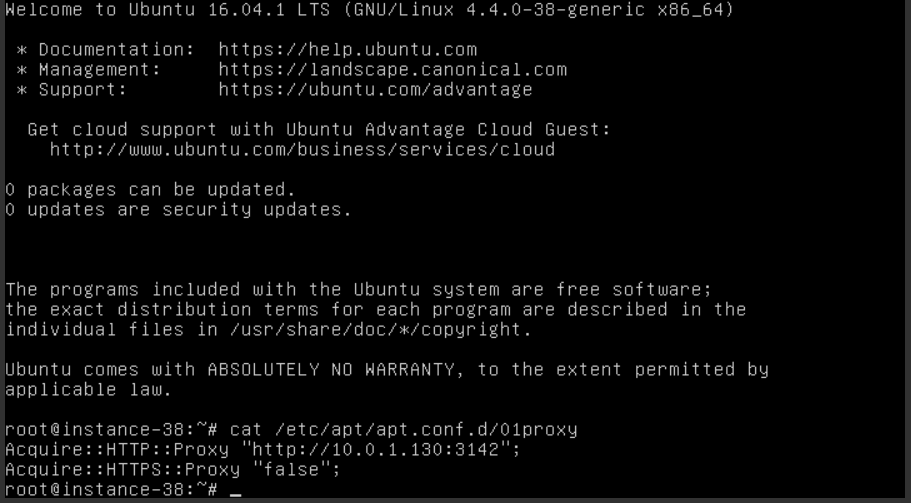
In this case, I’ve added a couple of commands to add a custom apt proxy configuration to apt. This points each instance to my local apt_cache_ng instance. This is useful to cache apt packages from many instances when installing lots of different software packages for example.
Once you save your script, it will be available when creating a new instance in the ‘New Topology’ screen.

Once the instance boots up, we should see the script was executed.
Ansible Integration
Wistar includes a dynamic inventory script for Ansible in the ‘extras’ directory. To use the dynamic inventory, export a topology to your Ansible project directory.
There is also a ‘load_topology_pb.yml’ playbook that can be used to take someone else’s topology and load it into your current environment and output an updated topology file for use with the dynamic inventory. For this to work, you need to import all the referenced image types into your wistar instance. I.E. if the topology to be loaded contains ubuntu16, vmx, and vqfx images, you will need to load all of those into your wistar instance before you can import this topology.
Finally, there is also an ‘install_wistar_ubuntu_16_pb.yml’ playbook that can be used to install Wistar on Ubuntu 16.
Proxy Ports
As of version 20171029, wistar has built-in proxy support. To access instances running on your Wistar server, you can now create a proxy process to proxy a port on the wistar server to the port on an internal instance. To use this feature, click on an instance from the topologies/edit screen, and click on the ‘Manage Port Proxies’ button. The ‘Local Port’ will be opened on the wistar host, and will proxy all packets to the selected instance to the ‘Remote Port’.